SMA校正キット(校正をしてみたが)

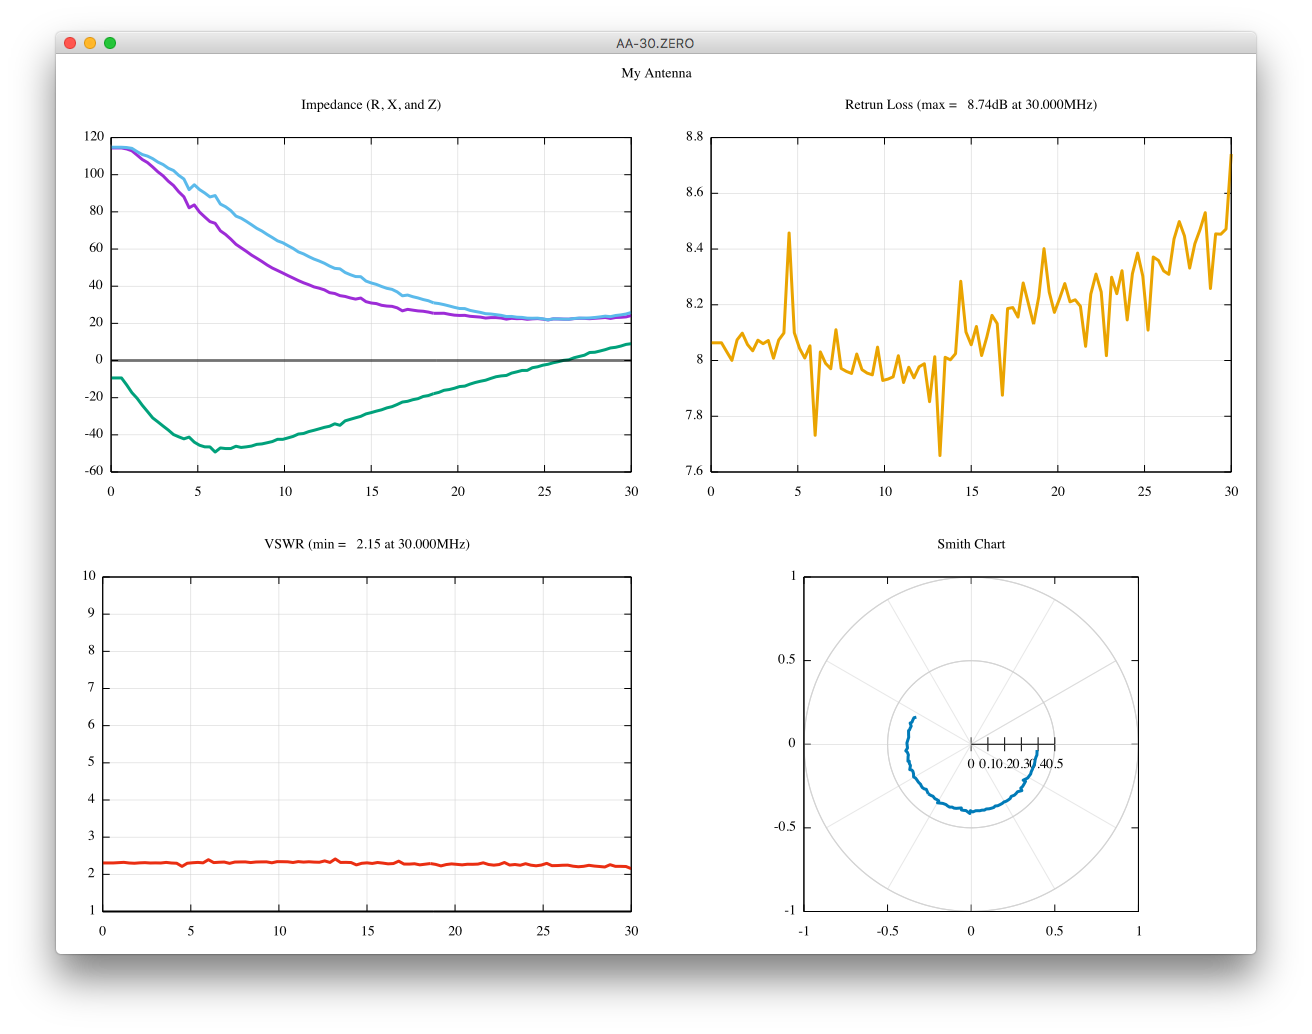
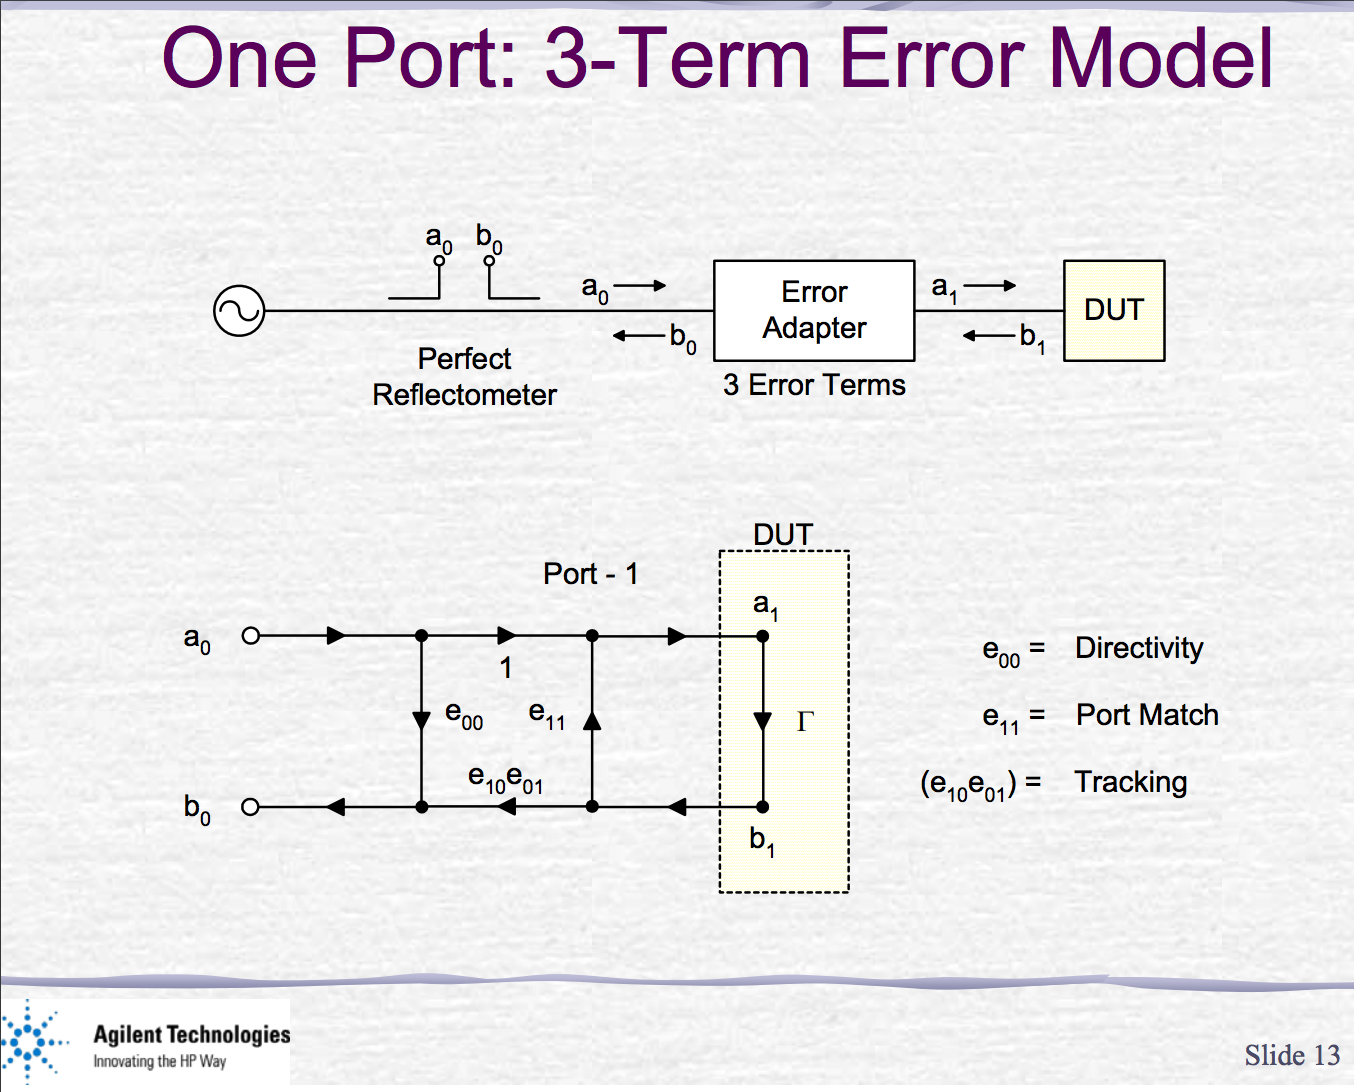
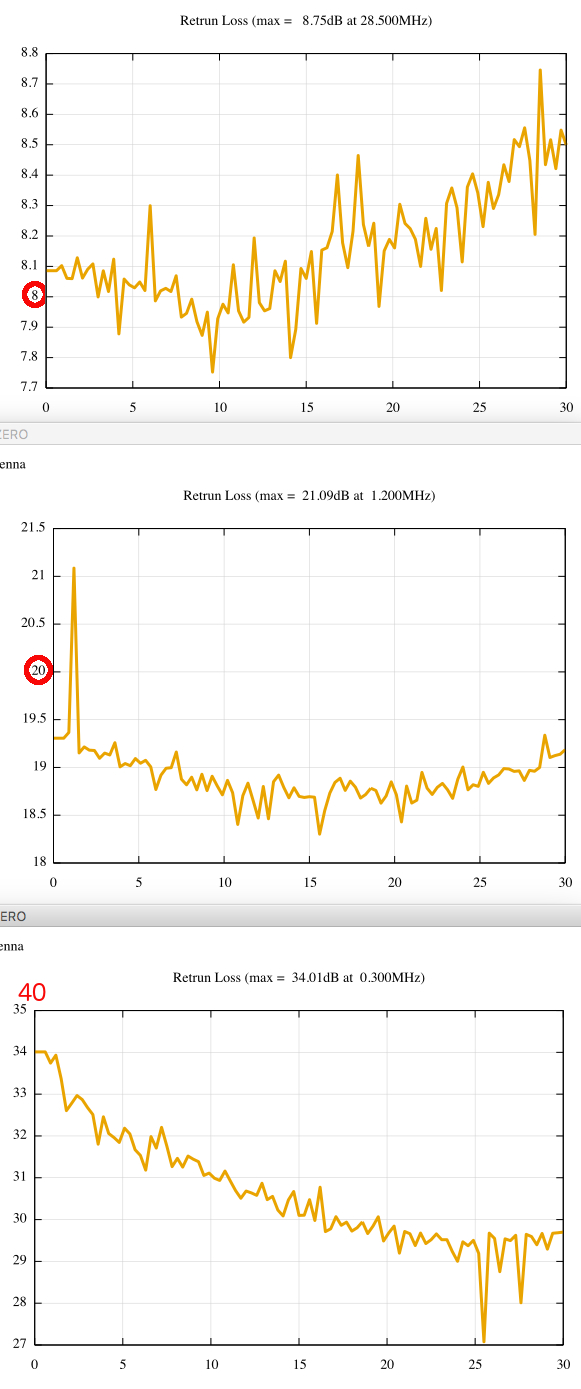
scikit-rfを用いて、1ポート校正がうまく出来ているのか、あまり自信がありません。
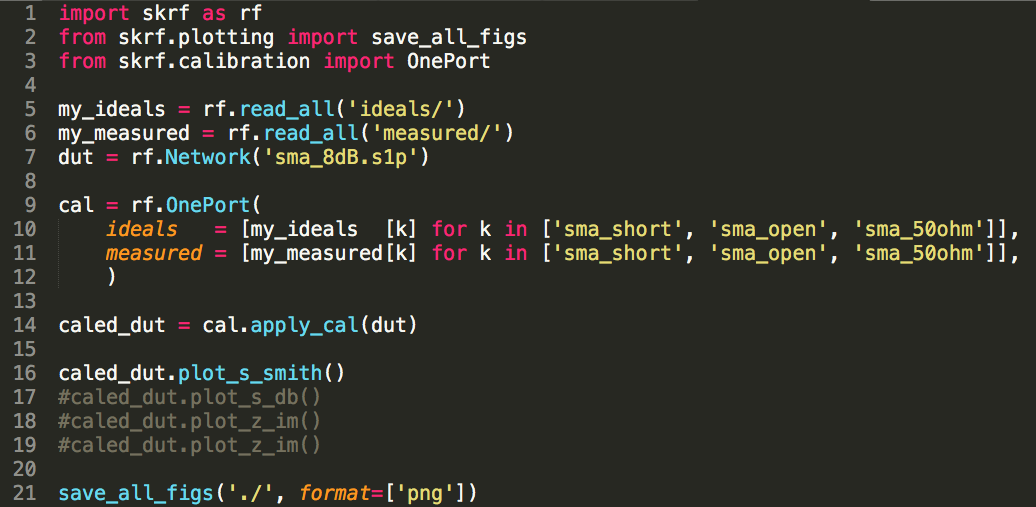
import skrf as rf
from skrf.plotting import save_all_figs
from skrf.calibration import OnePort

my_ideals = rf.read_all('ideals/')
my_measured = rf.read_all('measured/')
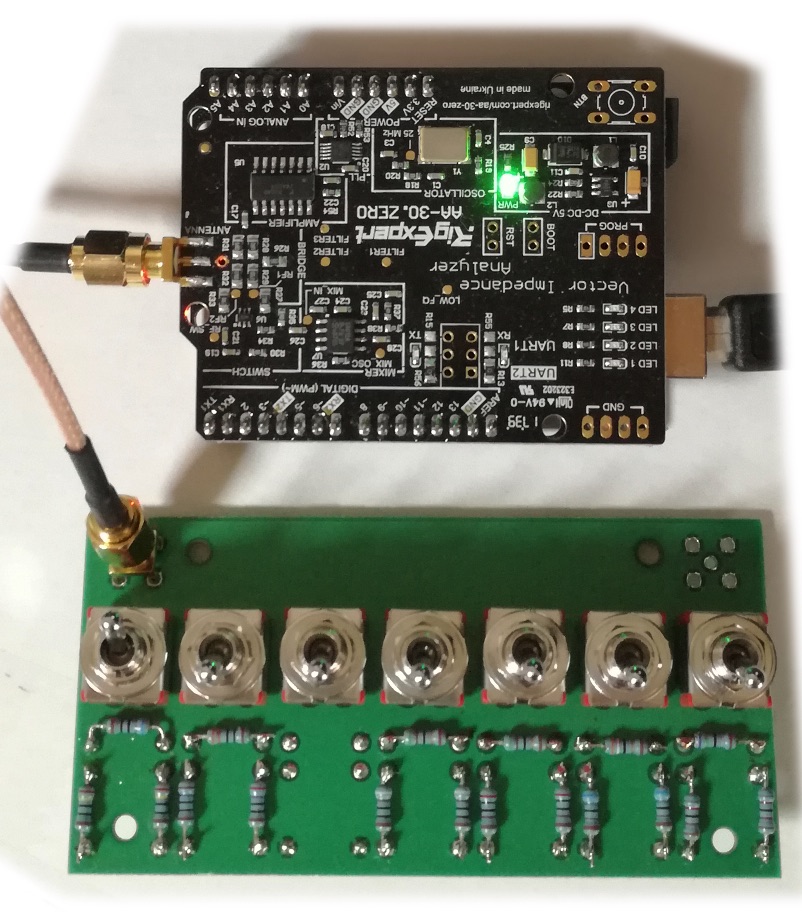
dut = rf.Network('sma_8dB.s1p')

cal = rf.OnePort(
    ideals   = [my_ideals  [k] for k in ['sma_short', 'sma_open', 'sma_50ohm']],
    measured = [my_measured[k] for k in ['sma_short', 'sma_open', 'sma_50ohm']],
    )

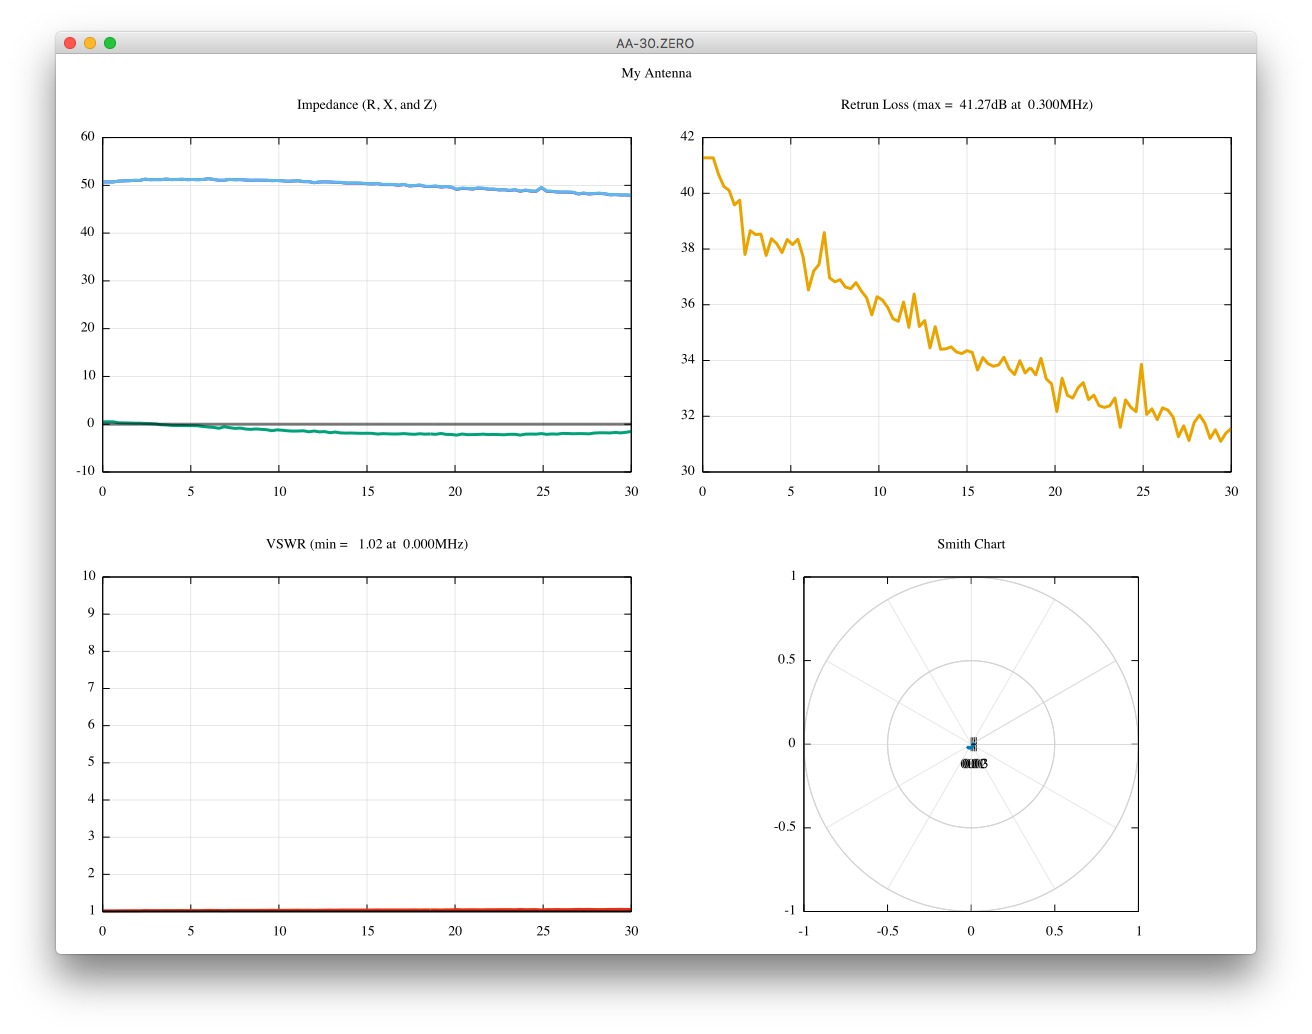
caled_dut = cal.apply_cal(dut)

caled_dut.plot_s_smith()
#caled_dut.plot_s_db()
#caled_dut.plot_z_im()

save_all_figs('./', format=['png'])
$ ls -l ./ideals/ ./measured/
./ideals/:
total 24
-rw-r--r--  1 user1  staff  869 Mar 31 20:02 sma_50ohm.s1p
-rw-r--r--  1 user1  staff  869 Mar 31 20:04 sma_open.s1p
-rw-r--r--  1 user1  staff  970 Mar 31 20:07 sma_short.s1p

./measured/:
total 32
-rw-r--r--  1 user1  staff  2686 Mar 31 20:13 sma_50ohm.s1p
-rw-r--r--  1 user1  staff  2450 Mar 31 20:13 sma_8dB.s1p
-rw-r--r--  1 user1  staff  2426 Mar 31 20:13 sma_open.s1p
-rw-r--r--  1 user1  staff  2337 Mar 31 20:13 sma_short.s1p
$ head ./ideals/sma_50ohm.s1p ./measured/sma_50ohm.s1p 
==> ./ideals/sma_50ohm.s1p <==
# MHz S RI R 50
0 0 0
0.3 0 0
0.6 0 0
0.9 0 0
1.2 0 0
1.5 0 0
1.8 0 0
2.1 0 0
2.4 0 0

==> ./measured/sma_50ohm.s1p <==
# MHz S RI R 50
0 0.00701499 0.00504031
0.3 0.00701499 0.00504031
0.6 0.00701499 0.00504031
0.9 0.00878989 0.0028871
1.2 0.00932459 0.00274434
1.5 0.00956452 0.00248623
1.8 0.01028 0.00211041
2.1 0.0100815 0.00206556
2.4 0.0127909 0.00148593

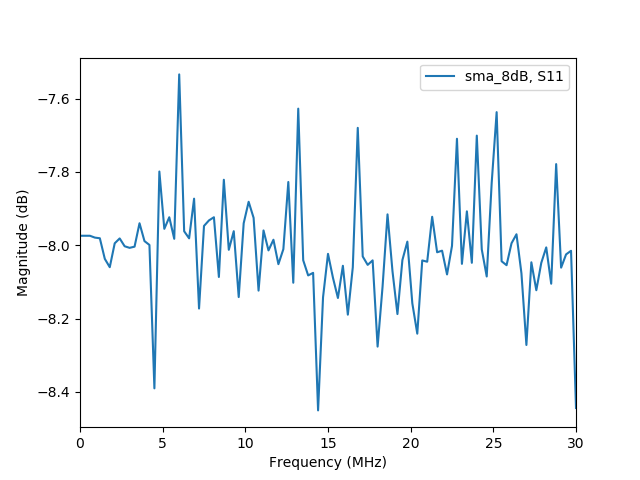
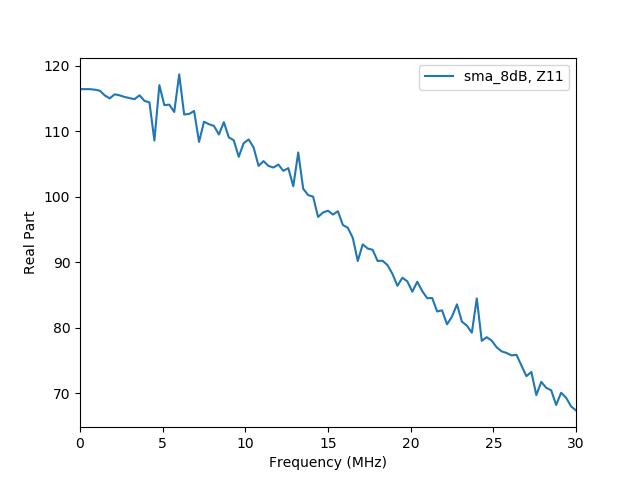
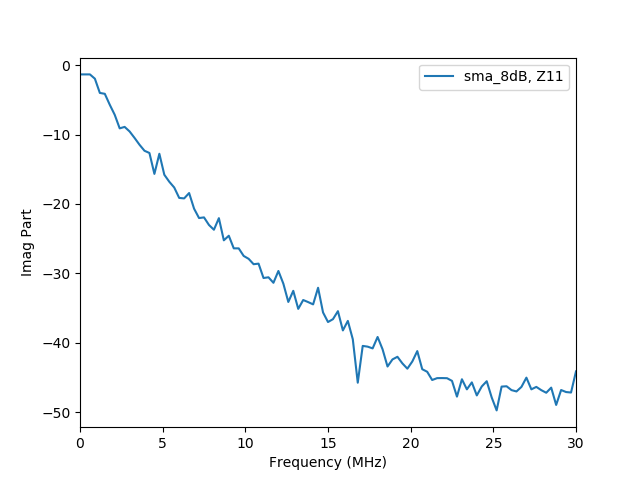
校正前より、良くなっているのでしょうか?

RFアッテネーターとリターンロス

アッテネーターの出力側はオープンなので、リターンロスは、各セクションの減衰量、 0.5dB, 1dB, 2dB, 3dB, 4dB, 10dB, 20dB、の2倍になるはずです。

キャリブレーションが行われていないことに注意して下さい。生データを表示しているだけです。

Docker Hub

あなたは、あなたのimageを、Docker Hubを用いて共用することができます。

上の図では、2つの仮想マシン上で、7つのコンテナが走っています。

mytest:part1というimageは、私のパブリックなリポジトリSpinorlab/mytestから、pullされます。

MacでDocker

$ docker version
Client:
 Version:	18.03.0-ce
 API version:	1.37
 Go version:	go1.9.4
 Git commit:	0520e24
 Built:	Wed Mar 21 23:06:22 2018
 OS/Arch:	darwin/amd64
 Experimental:	false
 Orchestrator:	swarm

Server:
 Engine:
  Version:	18.03.0-ce
  API version:	1.37 (minimum version 1.12)
  Go version:	go1.9.4
  Git commit:	0520e24
  Built:	Wed Mar 21 23:14:32 2018
  OS/Arch:	linux/amd64
  Experimental:	true
$ docker run -it ubuntu bash
Unable to find image 'ubuntu:latest' locally
latest: Pulling from library/ubuntu
22dc81ace0ea: Pull complete 
1a8b3c87dba3: Pull complete 
91390a1c435a: Pull complete 
07844b14977e: Pull complete 
b78396653dae: Pull complete 
Digest: sha256:e348fbbea0e0a0e73ab0370de151e7800684445c509d46195aef73e090a49bd6
Status: Downloaded newer image for ubuntu:latest

root@1001c7458899:/# uname -a
Linux 1001c7458899 4.9.87-linuxkit-aufs #1 SMP Wed Mar 14 15:12:16 UTC 2018 x86_64 x86_64 x86_64 GNU/Linux

KiCadとBOM(マルツに発注3)

XMLファイルで、各コンポーネントは必ずしも数字順に現れないので、pythonプログラムを少し修正しました。

# coding: utf-8
import xml.etree.ElementTree as ET
import re
from operator import itemgetter

print('"型番","メーカー名","数量"')

tree = ET.parse('RF-ATT.xml')
root = tree.getroot()

regex = r'R[0-9]+'
list = []

for node in root.iter('comp'):
	name = node.attrib.get('ref')
	if re.search(regex, name):
		for value in node.iter('value'):
			ref = int(name.replace('R', '0'))
			list.append([ref,value.text])

list.sort()

for i in range(len(list)):
	string = '1/4WキンピR '+list[i][1]+'Ω,KOA,1'
	print(string)

KiCadとBOM(マルツに発注2)

2つの抵抗を並列に用いることで、アッテネータの精度を改善することができます。

上の回路図に対応するBOMは;

% python xml2bom.py | nkf -s > BOM.csv
% cat BOM.csv | nkf -w
"型番","メーカー名","数量"
1/4WキンピR 8.2KΩ,KOA,1
1/4WキンピR 4.7Ω,KOA,1
1/4WキンピR 7.5Ω,KOA,1
1/4WキンピR 2.2KΩ,KOA,1
1/4WキンピR 6.8KΩ,KOA,1
1/4WキンピR 6.8Ω,KOA,1
1/4WキンピR 39Ω,KOA,1
1/4WキンピR 1KΩ,KOA,1
1/4WキンピR 2KΩ,KOA,1
1/4WキンピR 15Ω,KOA,1
1/4WキンピR 51Ω,KOA,1
1/4WキンピR 560Ω,KOA,1
1/4WキンピR 910Ω,KOA,1
1/4WキンピR 27Ω,KOA,1
1/4WキンピR 51Ω,KOA,1
1/4WキンピR 430Ω,KOA,1
1/4WキンピR 220Ω,KOA,1
1/4WキンピR 220Ω,KOA,1
1/4WキンピR 24Ω,KOA,1
1/4WキンピR 270Ω,KOA,1
1/4WキンピR 270Ω,KOA,1
1/4WキンピR 91Ω,KOA,1
1/4WキンピR 330Ω,KOA,1
1/4WキンピR 150Ω,KOA,1
1/4WキンピR 150Ω,KOA,1
1/4WキンピR 240Ω,KOA,1
1/4WキンピR 240Ω,KOA,1
1/4WキンピR 390Ω,KOA,1
1/4WキンピR 680Ω,KOA,1
1/4WキンピR 82Ω,KOA,1
1/4WキンピR 82Ω,KOA,1
1/4WキンピR 8.2KΩ,KOA,1
1/4WキンピR 2.2KΩ,KOA,1
1/4WキンピR 6.8KΩ,KOA,1
1/4WキンピR 1KΩ,KOA,1
1/4WキンピR 2KΩ,KOA,1
1/4WキンピR 560Ω,KOA,1
1/4WキンピR 910Ω,KOA,1
1/4WキンピR 430Ω,KOA,1

XMLファイルの中で、コンポーネントは番号順に現れません。多分、過去の編集履歴を反映しているのでしょうか?

% egrep 'comp.*R[0-9]+' RF-ATT.xml 
    <comp ref="R2">
    <comp ref="R3">
    <comp ref="R4">
    <comp ref="R1">
    <comp ref="R8">
    <comp ref="R9">
    <comp ref="R10">
    <comp ref="R7">
    <comp ref="R14">
    <comp ref="R15">
    <comp ref="R16">
    <comp ref="R13">
    <comp ref="R20">
    <comp ref="R21">
    <comp ref="R22">
    <comp ref="R19">
    <comp ref="R25">
    <comp ref="R27">
    <comp ref="R26">
    <comp ref="R29">
    <comp ref="R32">
    <comp ref="R30">
    <comp ref="R31">
    <comp ref="R28">
    <comp ref="R33">
    <comp ref="R35">
    <comp ref="R38">
    <comp ref="R36">
    <comp ref="R37">
    <comp ref="R34">
    <comp ref="R39">
    <comp ref="R5">
    <comp ref="R6">
    <comp ref="R11">
    <comp ref="R12">
    <comp ref="R17">
    <comp ref="R18">
    <comp ref="R23">
    <comp ref="R24">

このリストをソートすることは容易ですが、そのような手間をかけるべきかどうか良く分かりません。

KiCadとBOM(マルツに発注)

マルツは、日本にある電子部品の販売店です。彼らは、以下のようなフォーマットのBOMファイルを受け入れます。

どうも、彼らは、Shift_JISエンコーディングされた日本語しか理解しないようです。これは、多少残念なことですが、基本的な考え方は、常に同じです。

# coding: utf-8
import xml.etree.ElementTree as ET
import re

print('"型番","メーカー名","数量"')

tree = ET.parse('RF-ATT.xml')
root = tree.getroot()

regex = r'R[0-9]+'

for node in root.iter('comp'):
	name = node.attrib.get('ref')
	if re.search(regex, name):
		for value in node.iter('value'):
			string = '1/4WキンピR '+value.text+'Ω,KOA,1'
			print(string)

これはpythonのプログラムで、KiCadから出力されるXMLファイル(中間ネットリスト)を、マルツにアップロード可能なBOMファイルに変換します。

% python xml2bom.py | nkf -s > BOM.csv
$ cat BOM.csv | nkf -w
"型番","メーカー名","数量"
1/4WキンピR 1.8KΩ,KOA,1
1/4WキンピR 3Ω,KOA,1
1/4WキンピR 910Ω,KOA,1
1/4WキンピR 910Ω,KOA,1
1/4WキンピR 5.6Ω,KOA,1
1/4WキンピR 300Ω,KOA,1
1/4WキンピR 300Ω,KOA,1
1/4WキンピR 18Ω,KOA,1
1/4WキンピR 220Ω,KOA,1
1/4WキンピR 220Ω,KOA,1
1/4WキンピR 24Ω,KOA,1
1/4WキンピR 150Ω,KOA,1
1/4WキンピR 150Ω,KOA,1
1/4WキンピR 39Ω,KOA,1
1/4WキンピR 100Ω,KOA,1
1/4WキンピR 100Ω,KOA,1
1/4WキンピR 75Ω,KOA,1
1/4WキンピR 62Ω,KOA,1
1/4WキンピR 62Ω,KOA,1
1/4WキンピR 240Ω,KOA,1

このBOMファイルをアップロードすると、このようになります。

そして、あなたは今や発注を行なうことが可能です。

KiCadとBOM(部品表)

あなた自身の要求に合致した部品表ファイル、BOM (Bill Of Materials) を作ってみましょう。

最初に、あなたは中間ネットリストを、特にプラグインを用いずに出力します。

そうすれば、あなたは上の図のようなXMLファイルを得るでしょう。

# filename = xmlparse.pl
import xml.etree.ElementTree as ET
tree = ET.parse('RF-ATT.xml')
root = tree.getroot()

for value in root.iter('value'):
	print(value.text)

短いpythonのプログラムで、XMLトリーをパースしてやると、以下のような結果が得られます。

% python xmlparse.pl

Conn_Coaxial
Conn_Coaxial
SW-6P
1800
1800
3
SW-6P
910
910
5.6
SW-6P
300
300
18
SW-6P
220
220
24
SW-6P
150
150
39
SW-6P
100
100
75
SW-6P
62
62
240

シェルスクリプトを追加してやると;

% xmlparse.py | sort | uniq -c

   2 100
   2 150
   1 18
   2 1800
   2 220
   1 24
   1 240
   1 3
   2 300
   1 39
   1 5.6
   2 62
   1 75
   2 910
   2 Conn_Coaxial
   7 SW-6P

このような単純な出力でも状況によっては有用かも知れません。しかし、あなたが本当に欲しいのは、部品番号や部品名を含んだあなたの近所のお気に入りのパーツショップが理解してくれるリストです。