Raspberry PI 3用のADCボード

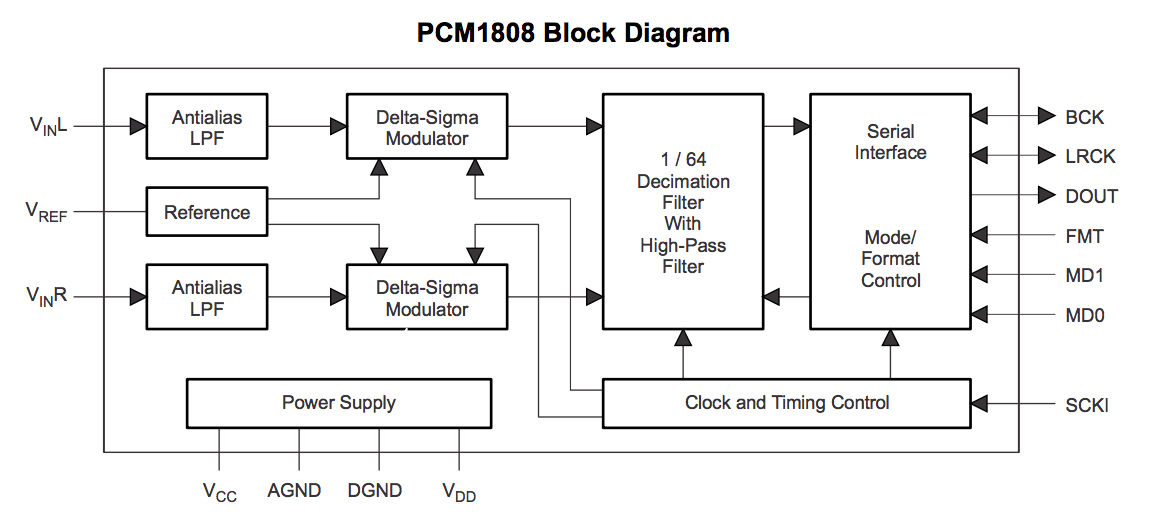
PCM1808(24-bit 96kHz ステレオ AD変換器)を用いた、ADCボードです。

http://select.marutsu.co.jp/list/detail.php?id=258

pi@raspberrypi:~ $ arecord -l
**** List of CAPTURE Hardware Devices ****
card 0: sndrpipcm1808ad [snd_rpi_pcm1808_adc], device 0: PCM1808 ADC HiFi pcm1808-dai-0 []
  Subdevices: 1/1
  Subdevice #0: subdevice #0

pi@raspberrypi:~ $ arecord -vD hw:0,0 -c 2 -d 60 -r 96000 -f S16_LE test96.wav
Recording WAVE 'test96.wav' : Signed 16 bit Little Endian, Rate 96000 Hz, Stereo
Hardware PCM card 0 'snd_rpi_pcm1808_adc' device 0 subdevice 0

LilyPond(2)

あなたは、あなたのソースコードをLilyPondが生成するMIDIファイルを再生することによってデバッグできます。\scoreブロックの中に、\midiブロックを挿入するだけです。

\score {
  \new StaffGroup <<
    \new Staff << \global \violineOne >>
    \new Staff << \global \violineTwo >>
  >>
  \layout { }
  \midi {
    \tempo 2 = 90
  }
}

LilyPond

LilyPondは、楽譜を作成するためのプログラムです。

どのように動作するのか見てみましょう。これが、ソースコードです。解読は容易でしょう。これを書くのに5分間程かかりました。

\version "2.18.2"
\header{
  title = "Sinfonie in g"
}

global = {
  \tempo "Molto Allegro"
  \time 2/2
  \key g \minor
}

violineOne = \new Voice \relative g''{
  \set Staff.instrumentName = #"Violin 1 "

  \clef "treble"
  r2 r4 ees8(\p d) d4 ees8( d) d4 ees8( d) d4( bes')
  r4 bes8( a) g4 g8( f) ees4 ees8( d) c4 c
  r4 d8( c)
}

violineTwo = \new Voice \relative g'{
  \set Staff.instrumentName = #"Violin 2 "

  \clef "treble"
  r2 r4 ees8(\p d) d4 ees8( d) d4 ees8( d) d4( bes')
  r4 bes8( a) g4 g8( f) ees4 ees8( d) c4 c
  r4 d8( c)
}

\score {
  \new StaffGroup <<
    \new Staff << \global \violineOne >>
    \new Staff << \global \violineTwo >>
  >>
  \layout { }
}

ソースファイルをセーブしてコンパイルして、pdfファイルを得ます。そうら、できた!

Raspberry PIとpigpioライブラリ(2)

シェルコマンドpigsが、GPIOを制御するために提供されています。

pi@raspberrypi:~/Zpigpio $ sudo pigpiod

pi@raspberrypi:~/Zpigpio $ pigs w 4 1
pi@raspberrypi:~/Zpigpio $ pigs r 4
1
pi@raspberrypi:~/Zpigpio $ pigs w 4 0
pi@raspberrypi:~/Zpigpio $ pigs r 4
0

Raspberry PIとpiscope

piscopeは、Raspberryのためのディジタル波形ビューアーです。それは、選択されたGPIOの状態(ハイかロー)を、ローカルでもしくはリモートで表示します。